Bottling Wormy Pears

photo-96

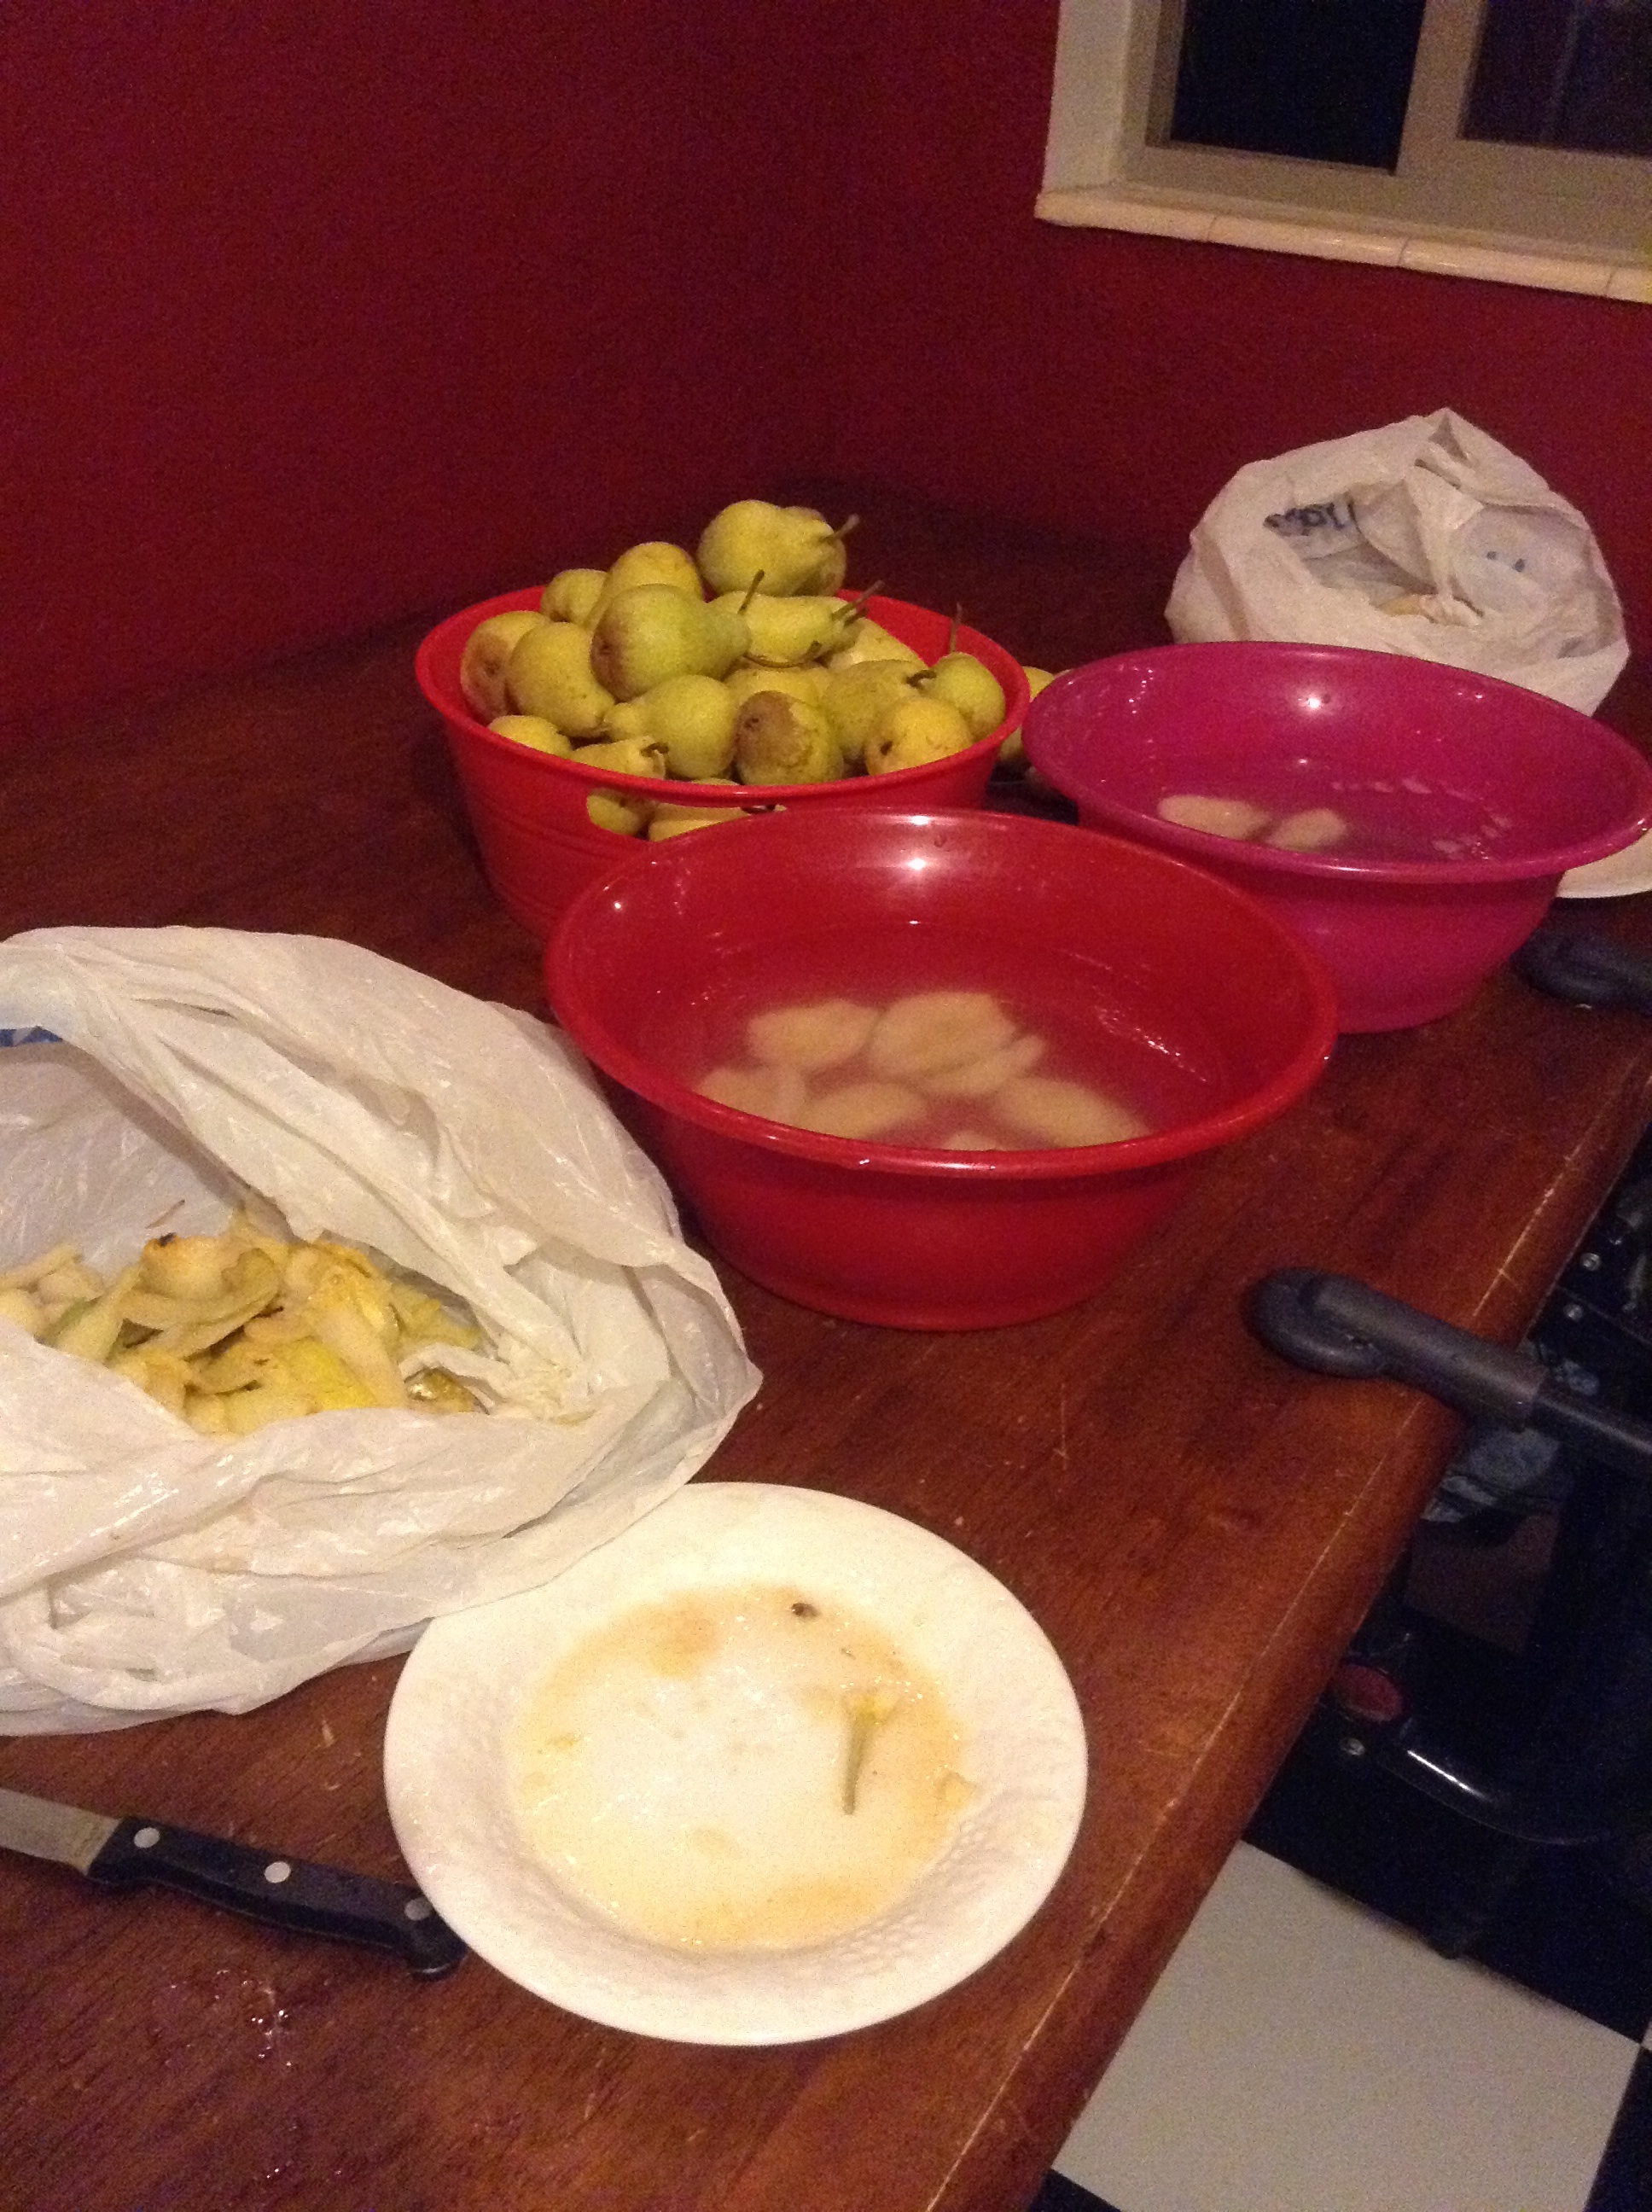
I found this creepy worm while trying to bottle pears. You can see its disgusting, wriggly body in the left center of the picture.

Would you like a few worms with your freshly bottled pears? Neither would I. That is why I ended up chucking an entire half-bushel of Bartlett pears.

I should have known. When I saw an online ad for pears that were half the price of any place nearby. That was a red flag.

When I drove into the heart of a broken down city scrambling to find a rundown home on the side of a dirt/gravel road I should have suspected. That was a red flag.

When the guy insisted on cash only. When he mentioned that he doesn’t spray his trees because likes to grow his pears “organically.” When he told me it was his first year selling.

Red flag, red flag, red flag.

I texted this to my husband while getting ready to leave:

“I entered the ghetto, bought pears and lived.”

Red flag!

But I was so proud of the fact that I stumbled upon a great deal, I was blinded by the price tag. I should have paid $10 more and got a box of beautifully sized worm-free pears.

But I didn’t. I called the number of the online ad, drove to a shady part of town, picked up my pears and a week later busted into three of them only to find three small, peach colored wriggly worms staring back at me.

Disgusting.

I could have dealt with one worm. Maybe even two.

But by the time I saw the third worm I was ready to throw up. I quickly dumped all of the pears into a plastic sack and made my husband toss them in our outside garbage can.

One half-bushel gone. Wasted.

photo-95I was all set up and ready to whip out several bottles of beautifully white, halved pears. I went to bed pearless.

I was sad. My husband was happy. That meant he didn’t have to help me peel, core and bottle a bunch of pears.

I swore off bottling pears and decided to buy a case of cans of pears to get us buy this year. There’s no way you can get me to cut open another raw pear for a long time.

I should have forked over a little more money to get a quality product. Sometimes my frugality leads to bigger problems.

Next time I’m going to a well-known fruit stand. Somewhere I wouldn’t be scared out of my mind to go back to and get a refund if the pears were worm-infested. Somewhere that is highly unlikely to have wormy pears to begin with.

To heck with saving a buck next fall, I’m going somewhere I can trust.

Dutch Oven Bug-Cooking Disaster

IMG658

A slug roasting on our Dutch oven lid.

It’s a miracle any of my children survived to eat the Dutch oven lasagna we cooked last week. Cooking outside in the wild ended up being just that – wild.

By the time we were ready to eat it I was ready to throw in the towel on motherhood. I swear I’m not cut out for most of these things.

I was cleaning up inside while my husband set up the Dutch oven in our cooking pit outside.

When I made it outside to check on our meal I was greeted by my two oldest boys who were so excited to show me something in a bubble bottle they couldn’t hardly contain themselves.

What was it?

A drowned Black Widow Spider. I’m not kidding. I’ve lectured them about touching them. I’ve tried to scare them to death with stories of how they will infect them with poison. But they just don’t seem to get the fact that spiders are dangerous. And Black Widows are number one or two on the danger list.

They assured me that they didn’t “touch” it. They used a set of pliers to pluck it from our backyard window well. Then they drowned it in the water.

Repulsive.

What was even more repulsive was when my husband dumped the stupid spider out of the bottle and it started wriggling around on the ground. The “drowned” spider was still alive and kicking.

I’m going to have to bug bomb my entire house to keep from having spider-fang-piercing-my-skin nightmares.

After the spider episode I went to the backyard to look for some cantaloupe from our garden. I was so stoked about a yellow-orange melon that fell off our vine that I forgot to keep an eye on our one-year-old. Where was he headed? You guessed it, straight for the fire-hot Dutch Oven.

The next thing I knew he was screaming and crying. He had burned two of his cute, chubby fingertips on the hot metal oven. I was horrified.

I can’t believe I forgot to keep him safe. Worst. Mother. Ever.

It took forever to calm him down. I kept running his hand under the cold water in our bathroom wishing it were my fingers that were burned not his.

To make me feel even better, my oldest son pointed out at dinner that it could have been much worse. Our baby could have fallen into the Dutch oven pit and burned his face.

Nice. Thank you for the mental image. At that point I couldn’t have felt worse.

We all went back outside and my two oldest got in a fistfight over a toy. My oldest ended up punching my five-year-old in the mouth several times.

I carried swollen mouth boy into the house and made him sit on one couch while the aggressor was forced onto the other couch. They sat in timeout for several minutes. Those were the calmest minutes of the night.

Then they were let off time out and back outside.

Just before our meal was done cooking, I heard my oldest shouting next to the Dutch Oven. Seriously? I thought he was burned too. But no, it was only his slug that was burned. And he wasn’t mad that it was roasting on the Dutch oven. He was mad that he dropped it prematurely.

Turns out that while my husband and I were cooking lasagna on the inside of our Dutch oven, our oldest two boys were cooking up a bug buffet on the outside.

Disgusting.

They were grilling insects on the lid of the oven. I nearly threw up.

In one hour my children had handled a wickedly dangerous venomous spider, boxed their brother’s face swollen, burned blisters to the tips of their fingers and roasted a delicious dinner of grasshopper and slug.

They were out of control and I was ready to give up.

The only thing that made me feel better was eating two giant slices of the homemade Dutch oven lasagna.

IMG661

It was delicious.

Then I went to bed, pulled the covers over my head and prayed that the next day would be more serene.

Luckily it was. Otherwise I may have quit.

Crock Pot Dinner Rolls

rolls 8I did it! I cooked 9 warm, fluffy, delicious dinner rolls in my 6-quart slow cooker.

I’ve wanted to do this for a really long time. I’ve thought about it, dreamt about it and wondered if it was possible. And since I’m banned from using the oven in the summer (you can read about that here and here) I’ve been craving rolls for months.

Finally on Monday I could take it no longer. I searched online for others who have used their crock pots as roll cookers and found someone else who had tried it.

That gave me inspiration. With the help of my boys, and a bag of Rhodes frozen dinner rolls, I was able to cook a bunch of rolls without heating up my entire house.

We tried them Monday and they got a little crisp on the ends so we did them Tuesday too. It was two nights of back-to-back-roll-eating goodness.

I’m so excited. Here’s how we did it.

First we greased the bottom of my crock pot with vegetable oil. We rubbed it onto a napkin then rubbed it onto the bottom of the pan.

Then we placed 9 rolls in the base of the crock pot – one in the center and eight around it in a circle.We made sure that the rolls weren’t touching the edge of the crock pot pan.

Then we put the lid on and turned the crock pot on low. We cooked it on low for 1 hour and 20 minutes which allowed the rolls to thaw, rise and begin to cook.

Then we turned the crock pot to high and cooked the rolls for another 10 minutes. (The first night we cooked them for an hour on high. I think that was a little too long and some of the roll edges got burned. You may have to play around with this time and adjust if need be.)

They ended up like this.

rolls 6

They may not have turned out as fluffy or round as other peoples’ rolls, but to me – someone who really struggles cooking normal-looking rolls – they looked beautiful.

If you want them with golden tops, I suggest popping them into the oven after they are done in the crock pot and broiling them for a minute or two. I was so happy with our rolls I didn’t bother with the broiler.

They may not have risen as high as they would have if I had baked them in the oven and they may not have been as golden, but they tasted great.
My husband pointed out that fall is coming and soon I will be able to cook in the oven again. But even then I’m sure I’ll use my crock pot to cook rolls every once in a while – especially when my oven is occupied cooking a casserole.

So there you have it – a fast, easy way to cook rolls in a slow cooker. It’s so easy my 7-year-old could do it. And he did, Monday night, which is his new night to help me cook dinner.

Going Dutch

Pizza-53Each summer my husband bans me from baking in our hotter-than-Hades-non-insulated-or-air-conditioned kitchen. Normally I just look at him, roll my eyes and ask him if that means he wants to starve.

Not this year.

This year he proposed a solution to the stress of oven-free living: the Dutch oven.

Every Friday for the past several weeks we have cracked open the cast-iron cooker and tried our hand at cooking mountain-man style.

Not only does this help keep our house temperature to a tolerable 78 degrees, it helps us practice new recipes to take camping. Next time we spend some time in the great outdoors, we’re going to eat in style.

We’ve had the Dutch oven for years and we’ve never really learned how to use it. Now we’re forcing ourselves to become experts.

I guess you could say we are going Dutch. When it comes to Friday-night eating anyway. I prepare the food while my husband prepares the oven – outside under our shaded patio.

So far we’ve had breaded chicken breasts with potatoes, ham and cheesy potatoes, pork ribs and potatoes, and – believe it or not – pizza.

I stumbled across an excellent website that has really easy recipes and a full-proof guide/chart for using briquettes (it tells you how many to use for what temperature you want to cook at.) If you get the urge to try cooking outside check out www.dutchovendude.com.

In years past, after my annual kitchen seasonal banishment, I have tried my hand at cooking on the grill – something I have not yet perfected, but it gets us through. I grill a mean honey ranch chicken breast and I have finally acquired a taste for bratwurst.

I have also made good use of the ever-famous slow-cooking crock pot. I’ve mastered several throw-it-in, turn-it-on recipes including an awesome chicken and rice burrito filling.

But the Dutch oven has rounded out our summer cooking nicely. I was going to wait to post about our new cooking style at the end of the summer, but it has been so fun, and the food has been so good, I thought I’d share so you could try it out too!

I strongly recommend it. There’s nothing like the smell of fire-hot briquettes on a warm summer night.

Now I don’t think we will starve, not this summer anyway.

Bake Potato Blow Out

potato1

Pieces of potato that I picked out of the bottom of my oven.

Just when I think I finally have a handle on how to cook for my family, I blow up a baked potato and find myself on my hands and knees scraping off veggie shrapnel from the far right corner of my oven.

Seriously? How hard is it to bake a potato? You wash it, poke it a bunch of times with a fork and viola! It’s ready to toss into the oven. I’ve done this a million times.

Well apparently this time I missed poking one last week – or I only poked it half as many times as I should have. Because while I was waiting for dinner I heard a loud boom and peeked into the oven to find that one of the potatoes was hollowed out with it’s insides shattered in a million pieces on my oven floor.

Dang.

The best part? The oven was too hot for me to clean up the mess and I forgot about it for several days. It wasn’t until I started smelling some serious charred food while preheating the oven a week later that I remembered the potato pieces.

Unfortunately the oven was too hot to wipe out so I found myself carefully wrapping my hands in hot pads and scraping out as much of that poor potato as I could. Then I started preheating it again. All the while hoping that I didn’t set off the smoke detector – something that happens frequently around here.

potato 2

The corner of my oven where a potato exploded last week.

I was trying to make enchiladas – one of my favorite recipes. (Thanks to my friend Joanel.)

When your husband walks in from work, takes one whiff of the kitchen and asks if we need to go out to eat, you know you have failed as a housewife.

Luckily, the enchiladas turned out just fine. We may have eaten dinner a little later than normal, but we did eat a home cooked meal. I think I have shared this recipe before, but just in case, here it is. If I can cook them, anyone can. I’m all about easy recipes. But then again I thought baking potatoes was easy. Guess again!

Enjoy!

potato 4

Green Chili Enchiladas

Green Chili Enchiladas

Ingredients:

– A Cup or So of Sour Cream

– 1 can of Cream of Chicken Soup

– Milk

– Onion

– A Small Can of Green Chilies

– Cheese

– Tortillas

– Cooked Chicken

Take some sour cream and the can of cream of chicken soup and combine them in a bowl. Add milk until it’s creamy. Then add the can of green chilies and onion. Take a tortilla, smooth a spoonful of the creamy sauce in the middle. Then sprinkle a handful of chicken and cheese on top. Roll into a burrito shape and put in a greased cake pan. Repeat until almost all of the creamy sauce is gone. Save about ½ cup.

Smear the saved ½ cup over the top of the burritos. Sprinkle with a little more cheese. Then bake at 375 degrees for about 45 minutes.

Gingerbread Trap


I am never making another gingerbread man. Ever. gingerbread-man-hi

I tried to do something nice and fun with my kids and it backfired.

Apparently I promised my oldest son that I would make gingerbread cookies with him Saturday night. The same night my husband was gone to a church meeting, my boys were going to a basketball game and I had to speak at a local event.

Somehow that promise had slipped my mind. So I found myself trying to whip up some last-minute cookies to keep him from flipping.

First of all, let me say that the ingredient list for gingerbread cookies is not for the amateur chef. I’d like to know who has molasses, ginger and cloves readily on hand.

Let’s just say that I don’t.

My neighbor doesn’t either. But she had something even better. A Betty Crocker gingerbread cookie mix.

One egg and ¼ cup water later and we were ready to roll. We threw several “men” into the oven and they were finished just as we were ready to leave for the night.

My boys didn’t get home until late and went straight to bed. Magically, in the middle of the night, two of the gingerbread boys disappeared.

The next morning I thought they would be thrilled that their creations had come to life, but my 6-year-old was far from thrilled. He was horrified.

First of all he was mad at me that I let the gingerbread escape. As if I had any control over it. He wanted to run the streets of Roy searching for him.

Secondly he was even more upset that part of his gingerbread (he thinks a leg, I think a head) had fallen off when the little guy “hopped” away. Somehow part of him was lying next to the pile of crumbs on the cookie sheet.

How part of that gingerbread boy got left behind, and how he could run away without his “leg” or “head,” I will never know.  Oops!

My oldest spent all of Sunday afternoon searching for footprints in our yard and building a trap to catch the remainder of the gingerbreads – A trap that required string, tape, fabric, etc. – A trap that tied to my oven and left a big mess in my kitchen – A trap that I made him take down.

I tried to convince him that the gingerbreads that were going to escape had already escaped.

We compromised. Now I have a pyrex glass container filled with gingerbread men sitting on my stove, covered with two bandanas tied extra tight.

image

I tell you, you try to do something fun with your kids and it backfires. My son couldn’t be excited that we made magical dough. He had to turn into a gingerbread hunting, killing machine.

It turns out, we don’t even like gingerbread cookies at our house. I don’t know how long those little men will sit trapped on my stovetop.

The only reason my oldest wanted to make the stinking things was to see if they would escape. Go figure.

Cardboard Cookies

For years I have spent a lot of time and money on building up my long-term food storage.

No one ever told me I would never want to use it.

I’m not saying I won’t ever need to use it, I’m just saying that after my cookies tasted like cardboard last week, it’s doubtful I’ll ever crack open another can.

I had the thought recently that I needed to start rotating my stored-up food supply. I have cans of flour that I packaged at my church’s food storehouse that date back to 2006. Others I packaged at my home in 2010.

Instead of buying fresh flour from the store, I’ve been opening cans from my basement and using what I’ve stored. I noticed that my baked goods have been coming out flat. I’ve had to add extra flour to each recipe to compensate.

I can deal with collapsed cookies, but I just can’t stomach ones that taste just plain out nasty.

Each Halloween our family makes ghost sugar cookies with M&M eyes. Last week, those poor ghosts tasted ghastly. I knew was something was amuck when the dough tasted a little bitter. But my two oldest boys keep asking for more samples and reassured me it was delicious.

They must have no taste buds.

After rolling out more than 60 ghosts, baking and then frosting them, I let them sit for the night. The next day, before I took the cookies to a Halloween party, I finally tasted one.

YUCK! I told my husband I was going to trash them all and he let me. That’s when I knew they were bad.

Making sugar cookies is hard work. I nearly cried when I had to dump the 5-dozen ghosts into my outside trash bin.

I really think it was the old flour.

My church encourages its members to have a well-established food reserve to draw on in times of natural disaster or personal crisis. I’ve been trying to slowly grow our hoard. I can’t imagine not being able to feed my little family if we fall on hard times.

But I am going to have to do some research and try something else when it comes to flour storage.  I may end up purchasing a wheat grinder and canning wheat from now on. But who know what that type of diet will do to our tummies if we ever have to use it.

And who knows what I am going to do with the dozens of #10 metal cans filled with musty old flour lining the shelves in my basement.

It sickens me to think that I’m not going to want to cook with any of it. Not even in a disaster – or personal crisis.

Then again, maybe it won’t matter if I am starving. Maybe cardboard tastes loads better when your stomach is empty.

What’s in your long-term food supply? Have you had any success cooking from food storage?

Tasty Tortillas

I refuse to buy any more cheap tortillas – even if they are only .88 cents at the local grocery store.

No matter how long I microwave them or how slowly I try to peel them apart, I end up either shredding them to bits or wearing them to paper-thin thickness in the center.

I don’t know about you, but I can’t eat a juicy taco on a paper-thin tortilla. And heaven knows my little boys can’t.

I should just stop at Costco and get the jumbo pack of quality tortillas for less than $5. But I haven’t dared brave that store since the arrival of our newest baby.

So a couple weeks ago I tried my hand at making homemade tortillas. My boys and I were craving cheesy quesadillas after church on Sunday but we only had a couple of store bought tortillas left. (Why I thought to do this right after church when we all were starving is beyond me.)

Anyway, I found a super easy 5-ingredient recipe here here.

After mixing the stuff together and letting the dough sit for half an hour, I was ready to roll.


I am definitely not a pro at using the rolling pin. Most of the tortillas ended up looking anything but round. I actually think the shapes got weirder with each tortilla. But no matter the shape, they all taste the same, right?

My oldest son helped me roll the dough into balls. Here’s what my table looked like when he was done.

My husband came home just after I finished toasting the last tortilla. I think he ate 1/3 of the batch right then. That meant either they were really good or he was really hungry.

It turned out to be so easy that I thought I’d share the recipe. If I can do it, ANYONE can.

Now I don’t know that I’ll make them all the time, and I’m definitely not ready yet for a job at Costa Vida, but it was really nice to have a success in the kitchen for a change.

No Cookie Dough Love

This slideshow requires JavaScript.

I love making sugar cookies and I love my boys. But I do not love making sugar cookies with my boys.

That is one more activity I am going to add to my I-wish-I-had-the-patience-to-do-that-with-my-kids list.

I have tried a few times to make yummy treats with my little ones’ “help.” But it never happens the way I think it should. The way I daydream it will. I guess it’s too much to ask a 3 and 5 year old to whip out their Martha Stewart skills.

My sons have no sense of order. No sense of tidiness. And when it comes to making cookies I swear they think our kitchen has transformed into an evil scientist’s lab. Either that or a Playdoh making factory – especially when we get to the cooking cutting part.

Last Sunday I decided to make heart-shaped Valentine’s cookies with the boys. It was going to be a great reverent Sunday afternoon bonding experience.

Yeah right.

We hadn’t been cooking five minutes before the first splash of flour rained down on my recently mopped kitchen floor and the stress sunk in. Our reverent activity turned into a nagfest as I tried to control them as they dumped ingredients into the Kitchen-Aid bowl.

Things only got worse when we started rolling out dough. I turned my back for a split second and they shoved their hands into the can of flour. I turned back around to a puffy white cloud and four pint-sized flour mountains on top of their “cookies.”

That’s when I lost it. I yelled at them for making a huge mess. All of a sudden our “fun” family activity had taken a turn for the worse.

My husband offered to help the boys finish. I am sure he could tell I was nearing a breaking point. But I was too stubborn to stop our fun-filled activity.

I had a giant ball of dough to roll out, cut and then bake and I realized my children weren’t going to be any “help.” So I gave up on getting their help. I gave up on keeping order.

I gave each of them a ball of dough and let them have at it. They rolled and cut and mixed who knows what into their dough samples for a long time. They each made their own “delicious” cookie filled with all kinds of goodies and topped with cherry fruit snacks.

Giving up on the perfect cookie-making experience did wonders for my nerves but it was a devastating for my poor, innocent kitchen. When we were finished I swept up an inch of flour from off of the floor.

I have fond memories of rolling out dough and helping my mom make treats. Those memories don’t include my mom ever yelling at me for the dough sticking to the table or for flour getting on the floor. How did she do it? How did she keep her cool? We always had a great time. I am worried my children won’t have any memories like that. I wish I were more patient.

I think a lot of times I set my expectations far too high. I should have realized that making cookies with two little boys was going to be disastrous.

Maybe someday I’ll be ready to try making sugar cookies with them again. But probably not until I can get on some anti-anxiety meds.

Take That Turkey

It’s no secret that I struggle in the kitchen. I set off the smoke alarm every time I make French toast or pancakes. So I was probably being a little ambitious when I decided to try cooking a turkey.

Right before Christmas I saw a killer deal on turkeys at my local store. I rummaged through the pile of frozen birds and found the smallest 97-cents-per-pound one that I could see. I took it home and chucked it in my freezer.

I thawed it out a few weeks later and got ready to put it in my Crock Pot. But no matter how I arranged it, it was not going to fit. At least three inches of the bird’s backside was still sticking out the top.

Not only did the turkey not fit in my pot, I couldn’t find the giblet packet. The instructions said it would be by the gravy pouch, but they were nowhere near each other. No matter how many times I peeked inside that naked bird, I couldn’t see it.

So the giblets were still inside and I had nowhere to cook my turkey. I found a broiler pan in the drawer under my oven and decided to try to cook it on that. I was going to cook the turkey all day in my Crock Pot, but it only needed to cook a few hours in my oven. So I cleaned everything out of my fridge’s bottom shelf and stuck the pan and the bird in there to stay cool.

When it came time to throw it in the oven I didn’t have an oven bag so I poured some sautéed celery and onions on top and brushed some vegetable oil all over the turkey’s skin.

I was scared to death that we would cut it open and “poof” it would be hollow like the one on National Lampoon’s Christmas Vacation. So every 45 minutes I opened the oven door and brushed more oil on top.

Success! Several hours later it was done and it was juicy. My husband even found the giblet packet. It was near the turkey’s rear, not front.

Those burnt looking things on top are the onions that I used to season the bird. And no, we did not eat those.

My family had a great turkey dinner and we ate sandwiches for days.

But the best part about my turkey turning out was the fact that I was able to use the cooked meat for two other main dishes. I made Creamy Chicken (Turkey) Noodle soup and Chicken (Turkey) Enchiladas from the leftovers. Two of our family’s favorite meals! I’ve included the recipes below if you want to try them.

The turkey-cooking success was a step in the right direction. I’m not ready to cook prime rib or anything, but I am getting better. I just need to keep trying.

What have you made lately that has been delicious?

Here are the recipes for the soup and enchiladas. I got them from two of my best friends who really do know how to cook .

Creamy Chicken Noodle Soup

Ingredients:
2 quarts water
5 chicken bouillon cubes
2 cans cream of chicken soup
1 cup sour cream
3 cups cooked cubed chicken
celery and carrots (as much as you like)
1 box of mini farfale (butterfly) pasta noodles or a bag of egg noodles

Instructions:
Chop celery, carrots, misc. Boil vegetables with the water for the pasta noodles. Cook the noodles in the water with the vegetables as directed on their box. Then put 2 quarts of water in a different pan with bouillon cubes until cubes dissolve. Then add cream of chicken soup and sour cream. Drain the noodles and vegetables and add them too.

Chicken Enchiladas

Sour Cream
1 can Cream of Chicken Soup
Milk
Onion
Small can of chopped green chilies
Tortillas

Take about one cup or so of sour cream and mix it with a can of cream of chicken soup and a small can of chopped green chilies. Pour a small amount of milk in until it is creamy. Take a tortilla, line the middle with a small amount of the sauce, a handful of chicken and some cheese. Roll it into an enchilada shape then put in a baking dish. When you have used up all of the chicken, take the remaining sauce and pour it over the top of the enchiladas. Sprinkle the top with cheese.

Bake at 375 for 45-60 minutes.

Previous Older Entries

%d bloggers like this: